
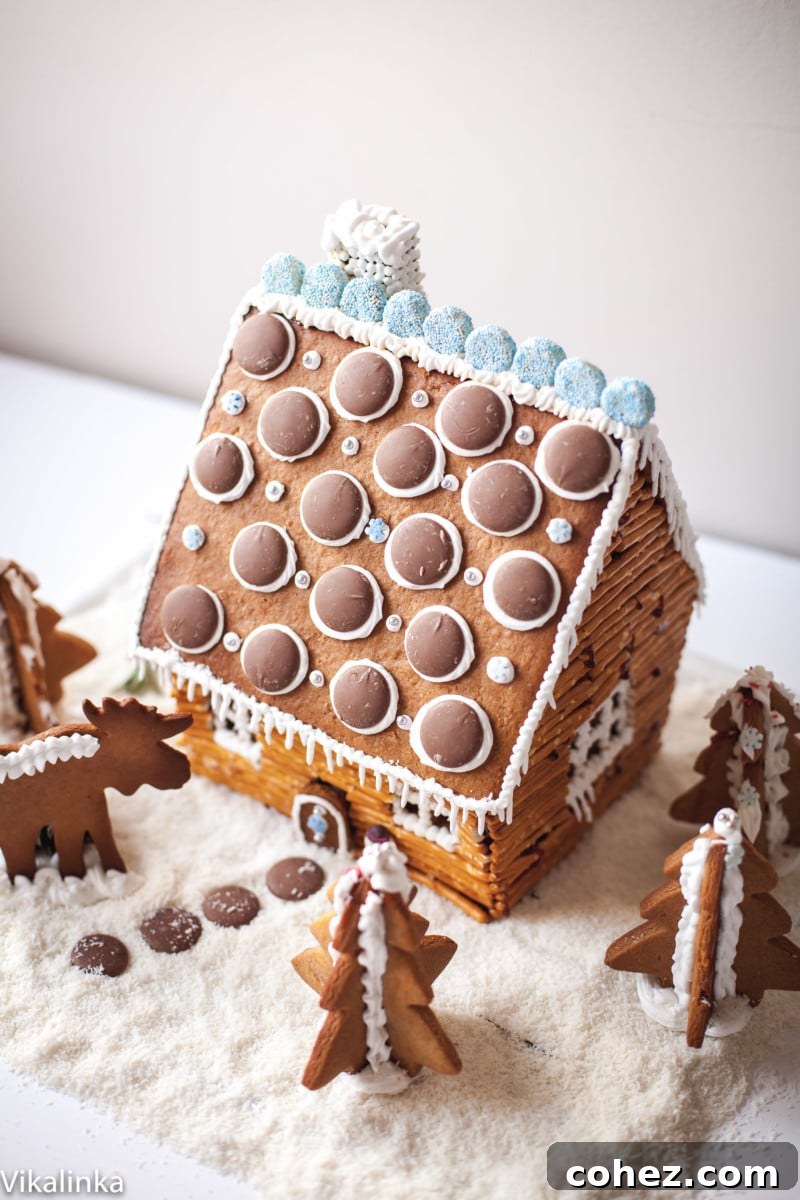
Homemade Gingerbread Log Cabin: A Festive DIY Guide to a Sturdy, Beautiful Edible Home
There’s an undeniable magic that permeates our home during the festive season, and at the heart of it lies our annual gingerbread house tradition. It’s more than just a baking project; it’s a cherished ritual, usually culminating in a grand assembly on Christmas Eve. The air fills with the warm, spicy scent of ginger and cinnamon, mingled with laughter and the quiet concentration of little hands at work. Looking back at photos from previous years brings an inevitable smile to my face—capturing sneaky children expertly diverting miniature candies from the house’s walls straight into their mouths, convinced their stealthy operations go unnoticed. Oh, the joys of childhood and the camera’s unforgiving lens!
From Store-Bought Kits to Baking Bliss: Embracing the Homemade Challenge
For many years, our gingerbread house adventures started with a pre-made kit. While convenient, there was always a part of me that yearned for the full experience – the rich aroma of baking gingerbread from scratch, the satisfaction of cutting out each wall and roof panel, and the creative freedom of designing a unique confectionary abode. This year, an exciting opportunity arose when OXO Good Grips collaborated with Stork to launch the ultimate blogger challenge: bake your own gingerbread house entirely from scratch and let your imagination soar. They generously provided all the essential tools for both baking and decorating, presenting an offer too enticing to decline.
The thought of crafting my very own gingerbread masterpiece filled me with exhilaration. My mind immediately conjured two distinct visions: a cozy, rustic Canadian log cabin, or an intricately adorned Russian palace. After a moment of careful consideration, and acknowledging this would be my first genuine attempt at baking a gingerbread house from the ground up, I decided to pace myself. A charming, straightforward log cabin felt like the perfect starting point, allowing me to master the fundamentals before tackling more elaborate architectural confectionery.
Designing Your Dream Gingerbread Log Cabin: Concept to Cookie Cutters
Once the rustic log cabin concept was firmly established, the next exciting step was figuring out how to bring it to life. What elements would truly capture the essence of a wilderness retreat? I knew I needed “logs” for the cabin walls, miniature “trees” for a surrounding forest, and, of course, a majestic “moose” to complete the idyllic scene. A quick but thorough internet search, coupled with a diligent inspection of my existing collection of cookie cutters, quickly yielded all three necessities. It’s amazing what a little inspiration and a well-stocked kitchen can achieve!
Crafting the Perfect Gingerbread Dough for a Sturdy Foundation
For the basic structure of the house, I turned to a reliable template from Martha Stewart. However, the recipe for the gingerbread itself required a few thoughtful adaptations to suit my British audience. This meant converting measurements to metric and, crucially, substituting treacle for molasses. These small changes made a significant difference, resulting in a gingerbread that was not only incredibly delicious but also remarkably sturdy – a vital characteristic for any architectural confection intended to stand tall and proud throughout the holiday season.
The Secret to a Sturdy Gingerbread House: Why Hot Caramel Reigns Supreme
Traditionally, gingerbread houses are “glued” together with royal icing. While beautiful for decorative details, it can be notoriously slow to dry, and in humid climates like England, it becomes even trickier, leading to fragile structures. I sought a more robust, stable, and utterly fail-proof adhesive. My discovery? Hot caramel. Once again, Martha Stewart’s wisdom proved invaluable! The method is deceptively simple: melt a cup of sugar with the juice of half a lemon, and voilà! A powerful, fast-setting edible glue.
However, a crucial warning accompanies this brilliant technique: under no circumstances should you touch hot caramel directly. I cannot emphasize this enough. Unless you aspire to a career as a spy, where erasing your fingerprints is the first step, heed my advice. Trust me, I speak from personal, painful experience. My blistered fingertips are still healing from an unfortunate lapse in judgment. It’s not inherently dangerous if handled with extreme care, but please, don’t be careless – don’t be me!
The truly unfortunate part is that I audibly reminded myself (like a crazy person talking to the kitchen appliances) not to touch the caramel. Yet, so engrossed was I in the meticulous process of gingerbread construction, that I momentarily forgot and did it anyway! This entire endeavor might not have even materialized into a blog post were it not for my incredibly artistic friend, Carmen. She was on her way to help me decorate when I frantically texted her about my injury. She arrived, heroically rescued me, and finished assembling the house while I hovered nearby, clutching an ice pack for two agonizing hours. Thankfully, the pain eventually subsided enough for me to participate in the most enjoyable part of the process: decorating!
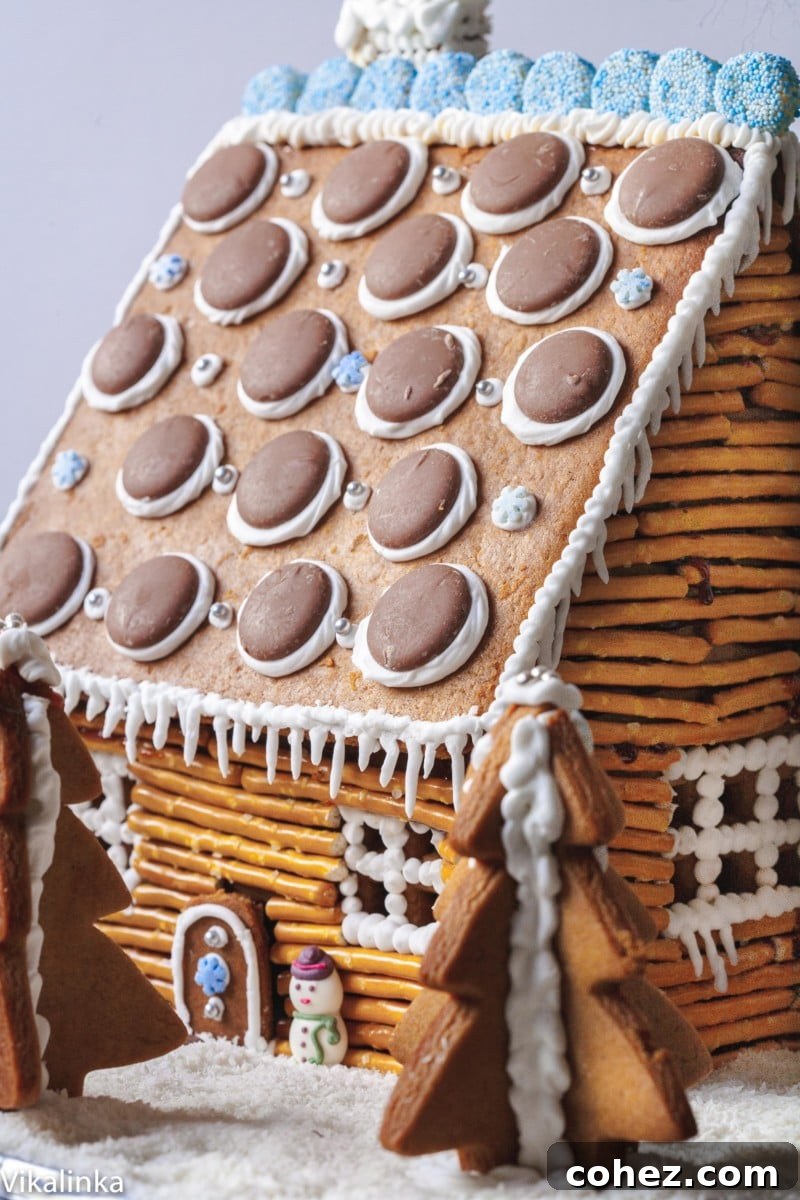
Despite my personal mishap, the advantages of using hot caramel for assembly far outweigh the potential danger when proper precautions are taken. Your gingerbread house will be permanently “glued” together, solid and robust, and the entire assembly process takes mere minutes! I used hot caramel not only to construct the main house but also to attach the pretzel sticks that form the rustic log cabin walls. For safety, always use a heat-resistant brush for application and consider wearing protective gloves. This job is unequivocally for adults only.
How to Make a Gingerbread House at Home {Rustic Log Cabin}
Julia Frey of Vikalinka
2
15
2 15
20
Ingredients
For the gingerbread house
- 250 g margarine like Stork
- 200 g demerara sugar
- 7 tbsp golden syrup
- 600 g plain flour
- 2 tsp bicarbonate of soda
- 4 tsp ground ginger
- 2 tsp cinnamon
- 1 tsp mixed spice
For the royal icing
- 3 egg whites
- 1/2 tsp cream of tartar
- 500 gr icing sugar, sifted
For the hot caramel
- 225 gr-sugar
- 1/2 lemon, juice of
For the decorations
- Pretzel sticks
- Giant chocolate buttons
- Silver balls
- Liquorice
- Any sweets of your choice
- Desiccated coconut
Instructions
For the gingerbread house
-
Heat oven to 350F/180C/gas 6.
-
Melt the margarine, sugar and syrup in a pan over low heat, stirring occasionally until fully combined.
-
In a large bowl, whisk together the plain flour, bicarbonate of soda, ground ginger, cinnamon, and mixed spice. Pour the melted margarine mixture into the dry ingredients and stir well to form a firm dough.
-
Wrap the dough in cling film and chill in the fridge for at least 1 hour. This makes it easier to roll and cut.
-
Prepare your gingerbread house template (Martha Stewart’s basic template is a great start). Cut out the paper template pieces.
-
Place a sheet of parchment paper on your work surface. Take about one-quarter of the chilled dough and roll it out evenly to a 1/4-inch (0.6 cm) thickness.
-
Lay a template section over the rolled dough and carefully cut around it with a sharp knife. Slide the gingerbread piece, still on its baking paper, onto a baking sheet. Repeat this process with the remaining dough, re-rolling any trimmings, until you have two side walls, a front and back wall, two roof panels, and the chimney pieces.
-
Any leftover dough can be cut into festive shapes like Christmas trees, moose, or stars to decorate your scene.
-
Bake in the preheated oven for approximately 15 minutes, or until golden brown and firm to the touch. Baking time may vary depending on the size and thickness of your pieces.
-
Immediately after removing the gingerbread parts from the oven, place your paper templates over them again. Use a sharp knife to carefully trim any expanded edges, ensuring all pieces are the exact original size for a perfect fit during assembly.
-
Transfer the trimmed gingerbread pieces to a wire rack and allow them to cool completely until they are hard and crisp.
For the hot caramel (ADULTS ONLY – Extreme Caution Required)
-
Pour the sugar and the juice of 1/2 lemon into a small, heavy-bottomed saucepan. Set it over medium heat. Do NOT stir initially. Wait until you see the sugar around the edges begin to bubble and melt, then gently stir until all the sugar is completely dissolved and the mixture is clear.
-
Continue cooking without stirring until the caramel reaches a beautiful amber color. Watch it closely as it can burn quickly.
-
Immediately take the saucepan off the heat. Work quickly as caramel hardens very fast.
-
To assemble the house, carefully brush the edges of your gingerbread pieces with hot caramel using a heat-resistant brush. Press the pieces together firmly and hold them for about 1 minute, or until the caramel cools and hardens, creating a strong bond.
-
Begin by assembling the four walls. Once the walls are secure, attach the roof panels, and finally, add the chimney.
-
When the house structure is complete, carefully set it on a sturdy cookie sheet or serving platter covered with aluminum foil or parchment paper.
For the royal icing & decorations
-
Next, prepare the royal icing.
-
In a large, clean bowl, combine the egg whites with the cream of tartar. Using a hand mixer or a stand mixer with the whisk attachment, beat on medium-high speed until the mixture becomes frothy.
-
With the mixer still running, gradually add the sifted icing sugar, about 1/2 cup at a time. Continue whipping until all the sugar is incorporated and the icing is very stiff and holds firm peaks.
-
Load the royal icing into a pastry bag fitted with your desired tip (a small round tip is excellent for details). To prevent the remaining icing from drying out, cover it directly with cling film.
-
Keep the tip of your pastry bag in a small glass with a tiny bit of water when not in use to prevent the icing from hardening in the tip.
-
Now, let your imagination run wild to decorate your house! Use the royal icing to create snow drifts, icicles, window panes, or to attach candies.
-
Sprinkle desiccated coconut all around the base of the house to mimic fresh snow. Use additional royal icing to securely set gingerbread trees, the moose, and any other decorative objects around the house, creating a magical winter scene. Pretzel sticks can be attached to the walls with royal icing (or directly with caramel during assembly) to give the log cabin effect. Giant chocolate buttons make great windows or roof tiles. Silver balls and liquorice can add festive touches.
Notes
Nutrition information is automatically calculated, so should only be used as an approximation.
Tips for Your Perfect Gingerbread House:
- Plan Your Design: Before you even start baking, sketch out your gingerbread house design. This will help you determine how many pieces you need and what cookie cutters or templates to use.
- Sturdy Dough is Key: A good gingerbread recipe for houses is less sweet and firmer than one for eating cookies. This ensures your structure won’t collapse.
- Precision Cutting: Trim your gingerbread pieces immediately after baking while they’re still hot and pliable. This creates crisp, straight edges that fit together seamlessly.
- Work in Batches: Don’t try to roll and cut all your dough at once. Work with small portions, keeping the rest chilled. This prevents the dough from becoming too warm and sticky.
- Safety First with Caramel: If using hot caramel, wear heat-resistant gloves and use a long-handled brush. Keep a bowl of ice water nearby in case of accidental contact, but prevention is best.
- Patience with Icing: If you choose royal icing for assembly, allow plenty of drying time between each section, especially for walls and roof. You can speed this up slightly with a fan, but don’t rush it.
- Creative Decorations: Gather a wide array of candies, nuts, dried fruits, and even edible glitter. Pretzel sticks mimic logs perfectly, while shredded coconut or powdered sugar creates a beautiful snow effect. Get the whole family involved in the decorating!
- Build a Base: Assemble your gingerbread house on a sturdy base, like a cutting board, cardboard covered in foil, or a large platter. This makes it easy to move and display.
- Embrace Imperfection: Remember, it’s homemade! Small imperfections add character and charm. The most important ingredient is the joy you put into making it.
The Enduring Charm of a Homemade Holiday Tradition
Creating a gingerbread house from scratch, particularly one as charming and enduring as this rustic log cabin, is an incredibly rewarding experience. It transforms a simple baking project into a captivating journey of creativity, precision, and a little bit of playful risk-taking (especially with that caramel!). The shift from pre-packaged kits to this hands-on approach has deepened our family’s connection to this beloved Christmas tradition, imbuing it with personal stories, shared laughter, and a tangible sense of accomplishment.
Whether you’re a seasoned baker or attempting your first gingerbread construction, I wholeheartedly encourage you to dive into this festive craft. The aroma that fills your home, the collaborative effort, and the sheer delight of seeing your edible masterpiece come to life are gifts in themselves. And when it’s finally complete, standing proudly adorned with sweet treats and snowy icing, you’ll have more than just a decoration; you’ll have a cherished memory and a delicious symbol of holiday cheer. Happy baking, and may your gingerbread house be both beautiful and blissfully sturdy!