

Embarking on the culinary journey of making naan from scratch might seem daunting, but I promise you, it’s an incredibly rewarding experience that will transform your home cooking. Since embracing homemade curries, a natural next step was mastering the art of naan. The satisfaction of pulling a warm, pillowy naan, fragrant with a hint of sweetness and butter, directly from your stovetop is unmatched. Not only is it a fraction of the cost of takeout or store-bought versions – making it a delightful win for your wallet (let’s call it “girl math” magic!) – but it’s also wonderfully healthier, free from the mysterious additives and preservatives often found in commercial options. These soft, slightly sweet, milky-smelling naans are best enjoyed hot and fresh, and with this easy-to-follow method using everyday kitchen staples, you’ll be joining the homemade rebellion in no time.
While the process of creating authentic naan bread involves a bit of basic kitchen chemistry, don’t be intimidated. If you’re completely new to bread making and looking for a no-fuss, first-time friendly recipe, you might want to start with a simpler option. For instance, a yeast-free, rapid-proof easy flatbread recipe can build your confidence before diving into the delightful world of yeasted naan. However, if you’re ready to elevate your Indian feast, stick around – homemade naan is truly a game-changer.

Crafting Perfect Homemade Naan on Your Stovetop
Let’s face it, most home kitchens aren’t equipped with a traditional tandoor oven, the cylindrical clay oven known for producing naan’s characteristic char and puff. And that’s perfectly fine! You absolutely do not need one to achieve incredibly authentic and delicious results. My recipe is specially adapted for Western kitchens, utilizing a heavy-based frying pan right on your stovetop. This simple adjustment yields naans that are just as pillowy, soft, and satisfying as any you’d find from a traditional method.
In a matter of minutes, you’ll be pulling off irresistibly bubbly, flour-soft naans with that gentle, satisfying chew. They are the ultimate accompaniment, perfect for generously mopping up every last drop of your favorite curry sauce. The thought of spending upwards of £3.50 for a single plain naan from a takeout, especially when all the essential ingredients are readily available and cost mere pennies in my own pantry, is truly eye-watering. The same goes for the mass-produced store-bought versions, often laden with unnecessary additives and preservatives. If you’re going to the effort of making a curry from scratch, it only makes sense to complete the experience with freshly made naan.
You might be surprised to discover that this naan bread recipe includes both milk and yogurt. These ingredients are key to the naan’s signature texture and subtle flavor. Milk enriches the dough, providing a tender crumb, while plain yogurt contributes a slight tang and an incredible cushiony spring, giving the naan its distinctive soft, pliable quality. This combination creates a mildly sweet and deeply flavorful bread that is far superior to anything pre-packaged.
While naan-making does require a little foresight due to the proofing time, the actual hands-on effort is minimal. It takes just minutes to mix the ingredients together and a few more to knead the dough – a process I personally find quite therapeutic! After this initial burst of activity, the dough simply needs an hour to an hour and a half to proof, allowing the yeast to work its magic. Once risen, it’s a quick process of rolling, shaping, and cooking on your hot stovetop.
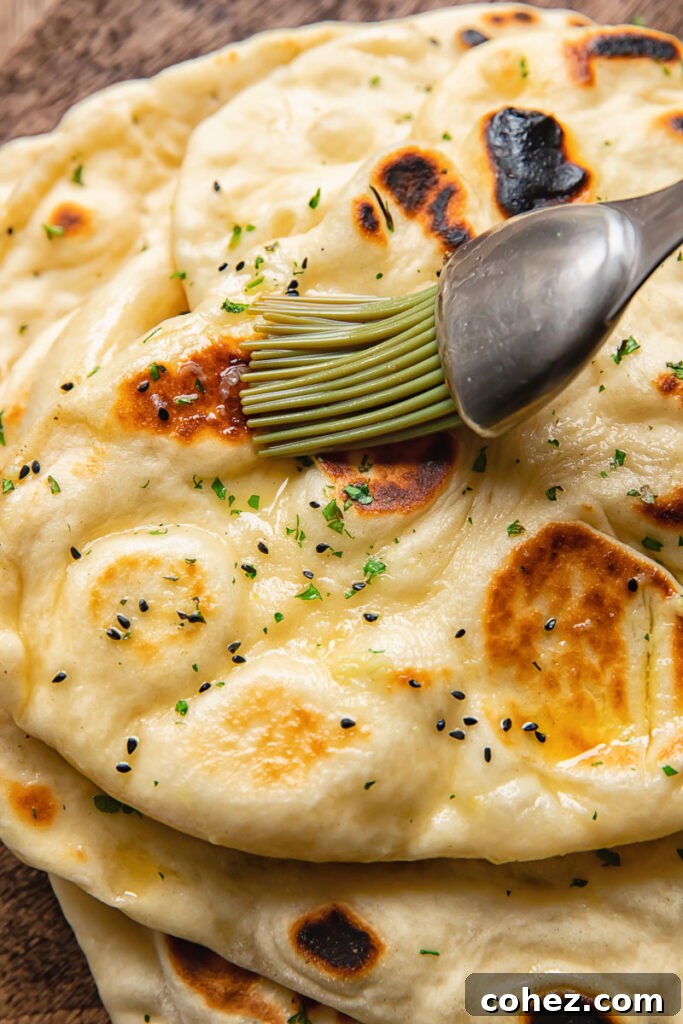
For an extra layer of aroma and flavor, I often add nigella seeds and fresh coriander (cilantro) to my naan dough. And for those who adore garlic, creating garlic naans is effortlessly simple: just melt some butter with grated garlic and brush it generously over the hot, freshly cooked naan. The aroma alone is enough to transport you! The profound satisfaction of creating an entire Indian feast from scratch, complete with homemade naan, is truly second to none. It’s an experience that nourishes both body and soul.
Expert Tips for Naan Perfection
- Despite its exotic reputation, the process of making homemade naan bread is surprisingly similar to baking any other yeasted loaf. The primary difference lies in the cooking method – a frying pan instead of an oven. If you’ve previously experimented with my easy flatbread recipe, you’ll find many familiar steps, making this a comfortable progression.
- Yeasted doughs can be a bit sensitive to temperature, especially in cooler environments. Here’s a clever hack to ensure proper proofing even in a chilly kitchen: Preheat your oven to its lowest setting for just a few minutes, then turn it off. Alternatively, place a bowl of freshly boiled water inside the oven, close the door, and let it warm the interior. Once the oven feels comfortably warm (not hot!), remove the water bowl and place your dough bowl inside to proof for the required time. Remember, the oven should be off for this trick!
- For first-time naan makers, embrace the charm of these delightful tear-shaped flatbreads. Their beauty often lies in their wonderfully rough and rustic appearance. Don’t stress about shaping each piece into a perfectly uniform or symmetrical form. It’s the inviting texture, the soft chew, and the incredible flavor that truly count!
- Naans cook very quickly on a hot pan. To ensure a smooth cooking process, it’s a great idea to have at least two dough portions rolled out and ready to go before you start cooking the first one. This way, as one naan is bubbling in the pan, you can prepare the next, maintaining an efficient flow.
- Nigella seeds (also known as kalonji) and fresh, chopped cilantro (coriander in the UK) are my preferred flavorings for naan. Cilantro offers a bright, fresh, and zingy note, while nigella seeds provide a subtle, slightly bitter, and onion-like complexity that is uniquely delicious. Don’t hesitate to try them, or feel free to omit them if they’re not to your taste. This is your naan, after all!
- Working with a thick, heavy-based pan, such as a cast-iron skillet, is ideal for cooking naan. Cast iron heats evenly and retains its heat beautifully, which is crucial for achieving that signature puff and char. If you don’t have one, a good quality non-stick frying pan will work perfectly well – just ensure it’s screaming hot before you place the dough in!
- Always brush your pan with a tiny amount of vegetable oil before cooking each naan. This prevents sticking and helps achieve a lovely golden-brown crust.
- Keep a close eye on your naans while they’re cooking. They can brown and even burn quite easily due to the high heat. You might need to adjust the temperature of your stovetop as you go along to maintain optimal cooking conditions. The cooking process is fast, so stay attentive!

Versatile Serving Suggestions for Homemade Naan
The simple pleasure and profound comfort derived from a steaming bowl of Nepalese red lentil dahl paired with a warm, homemade naan bread is truly unbeatable. For those who enjoy meat, a boldly spiced Indian kofta curry or a rich, creamy, and smooth butter chicken curry find their perfect partner in a freshly made naan. These soft flatbreads are essential for scooping up every last bit of delicious sauce, ensuring not a single drop goes to waste.
Beyond traditional curries, I always keep a handy stash of naans for a myriad of last-minute culinary needs. They serve as an excellent, sturdy base for lightning-fast homemade pizzas, offering a wonderfully chewy crust. They are absolutely perfect for dipping into creamy spreads like smoky baba ghanoush or a luscious whipped feta and ricotta dip. Imagine them as a delightful bread-side breakfast alongside a vibrant shakshuka, or as a more substantial flatbread to complement Middle Eastern dishes such as tender chicken souvlaki or aromatic chicken musakhan. The versatility of homemade naan makes it an indispensable item in any well-stocked kitchen.

Storage, Leftovers, and Making Ahead
To keep any leftover naan bread fresh and delicious, simply place them in an airtight container or a sealed bag and store at room temperature. They will remain soft and flavorful for 1-2 days. Reheating is a breeze: you can warm them on the stovetop in a dry pan over medium heat, gently toast them in the oven, or even pop them into a toaster for a quick refresh. They’ll regain much of their freshly cooked softness and warmth.
Preparing a multi-dish curry feast from scratch can involve juggling many tasks at once. To ease the pressure, you can absolutely get ahead by preparing your homemade naan in advance. Once cooked and thoroughly cooled, wrap each naan individually in plastic wrap or foil to prevent freezer burn, then place them in a freezer-safe bag. They can be frozen for up to 3 months, offering incredible convenience for future meals.
The best part about freezing naan is that, being a flatbread, there’s no need to defrost them! You can reheat them directly from frozen. Simply warm them through in a preheated oven at 400°F (200°C) for 5-6 minutes, or place them on a hot griddle or stovetop pan until they are warmed through and pliable. This prep-ahead strategy ensures you always have homemade naan ready to complete any meal.
Troubleshooting Common Naan Issues
- **Naan Not Puffing:** This is often due to inactive yeast (make sure it foams when mixed with sugar and warm milk), or the pan not being hot enough. Ensure your pan is screaming hot before adding the dough, and don’t overcrowd it. Covering the pan briefly after flipping can also help trap steam and encourage puffing.
- **Tough or Chewy Naan:** Overworking the dough during kneading or rolling can lead to tough naan. Knead just until pliable and smooth (about 5-10 minutes by hand, less with a food processor). Also, not enough liquid or proofing time can result in a dense texture. Ensure your dough is soft and adequately risen.
- **Naan Sticking to the Pan:** Make sure your pan is properly oiled before each naan, especially if using a non-stick pan that isn’t seasoned cast iron. A very hot pan generally helps prevent sticking as well.
- **Burnt Spots:** Naans cook quickly! Adjust your stovetop temperature as needed. Medium-high heat is ideal, but keep an eye on it. The bubbles will form fast, and the charring happens rapidly.
More Delicious Side Dishes to Try
- Truffle Aioli
- Air Fryer Garlic Bread
- Chickpea Tuna Salad
- Muhammara
Homemade Naan
Julia Frey of Vikalinka
1
40
5
1
45
8 people

Equipment
-
Food processor
-
Cast iron skillet
-
Pastry brush
Ingredients
- 150ml / 2/3 cup warm milk
- 2 tbsp granulated or caster sugar
- 7g / 2 tsp active yeast
- 450g / 3 3/4 cup bread flour
- 1 tsp salt
- 1 tsp baking powder
- 4 tbsp vegetable oil, divided
- 210ml / 3/4 cup plus 2 tbsp plain yogurt , full fat (not greek)
- 2 tbsp chopped cilantro / coriander , optional
- 2 tbsp nigella seeds, optional
For garlic naan
- 2 tbsp butter
- 1 clove garlic, grated or pressed
Instructions
-
In a medium bowl or a large measuring cup, combine the warm milk, sugar, and yeast. Let it sit for 10-15 minutes until it becomes frothy. If it doesn’t froth, your yeast is likely expired and needs to be replaced.
-
In the mixing bowl of a food processor (or a large bowl if kneading by hand), combine the flour, salt, the yeasty milk mixture, baking powder, yogurt, and 2 tbsp of vegetable oil. Knead for 5 minutes using the dough hook attachment until you achieve a soft and pliable dough. If kneading by hand, this will take approximately 10 minutes. Lightly coat the dough with 1 tbsp of vegetable oil, then cover the bowl and let it rise in a warm place until it doubles in bulk. This process can take anywhere between 1 hour and 1.5 hours, depending on the ambient temperature of your kitchen.
-
Once the dough has risen, turn it out onto a lightly floured surface. Gently shape it into a large ball, then divide it into 8 equal parts. Roll each part into a smaller ball, cover them with a clean kitchen towel, and let them rest for an additional 10 minutes. This short rest allows the gluten to relax, making the dough easier to roll.
-
While the dough balls are resting, prepare your cooking station. If you’re using a cast iron pan, preheat it over medium-high heat for approximately 7-10 minutes. Cast iron needs ample time to heat evenly and thoroughly. Alternatively, a non-stick frying pan can be used, which will require less preheating time. The key is for the pan to be very hot.
-
Chop up the cilantro leaves and set out the nigella seeds if you plan to use them as toppings. Have them ready for quick application.
-
Begin by taking one dough ball and rolling it out into an oval shape on your lightly floured work surface. For the iconic tear-shaped naan, gently stretch one end by hand. If desired, sprinkle one side of the rolled dough with either nigella seeds or chopped cilantro, and gently press them down with the palm of your hand to adhere.
-
Test if your pan is hot enough by sprinkling a tiny amount of water onto its surface. It should immediately sizzle and evaporate, indicating it’s ready for cooking.
-
Dip a bunched-up sheet of paper towel into the remaining vegetable oil and rub a thin layer onto the hot frying pan. Carefully place one rolled naan dough into the hot pan, seeded side down if applicable. Cook each naan until visible bubbles appear all over the surface, which can take up to 1 minute or even longer, depending on your pan’s heat. Then, flip the naan and cook the other side for an additional 30-45 seconds. I’ve found that covering the pan with a lid immediately after flipping can help the naan puff up even more dramatically. Watch very carefully during this stage, as naan can burn quickly due to the high heat!
-
Since each naan cooks quite rapidly, it’s highly efficient to always have two more dough portions rolled out and ready while one is cooking in the pan. This continuous process ensures a steady supply of fresh, hot naan.
-
To prepare garlic naan, melt the butter (in the microwave or on the stovetop) and stir in the grated garlic. Brush this fragrant garlic butter mixture generously over each naan immediately after it comes off the pan, as desired.
Nutrition
Calories: 182kcal
|
Carbohydrates: 28g
|
Protein: 6g
|
Fat: 5g
|
Saturated Fat: 3g
|
Polyunsaturated Fat: 0.4g
|
Monounsaturated Fat: 1g
|
Trans Fat: 0.1g
|
Cholesterol: 13mg
|
Sodium: 337mg
|
Potassium: 190mg
|
Fiber: 1g
|
Sugar: 5g
|
Vitamin A: 172IU
|
Vitamin C: 0.4mg
|
Calcium: 99mg
|
Iron: 1mg
Nutrition information is automatically calculated, so should only be used as an approximation.